Tuesday, October 14, 2014

Kids Clothes Week Fall 2014!

kid's clothes week

Kids clothes week starts in less than a week!

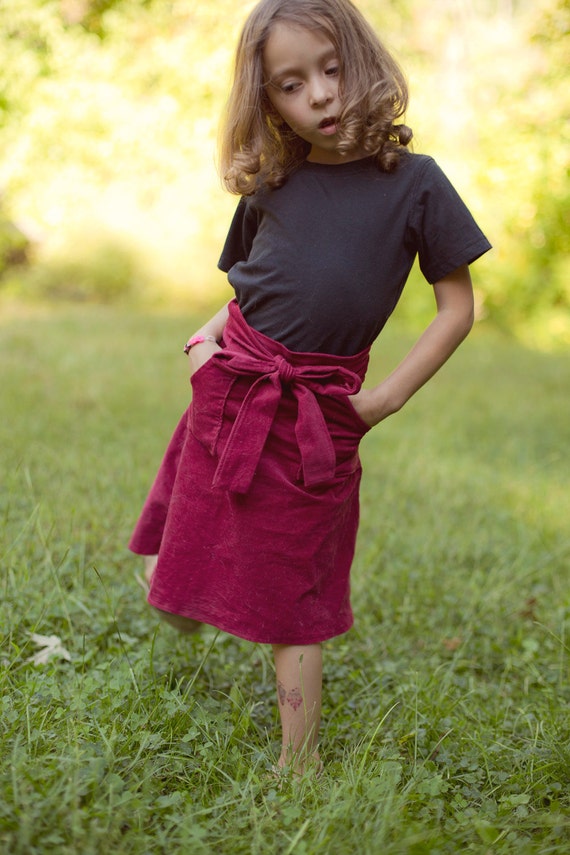
I love sewing for Kids Clothes week because it gives me the much needed motivation to make the things I've promised the girls. I've been sorting my Vintage Pattern collection recently, trying to leverage wordpress to create a visual database of them (which is taking a lot longer than I had hoped). Once of the patterns that I seem to have in many variations is a wrap skirt with pockets. Dahlia picked it out as one she wanted and I redrafted the pattern to her size and sewed it for her. I also graded it and turned it into a print-at-home pdf. Available here

She loves it. Trillian has requested one as well in "hot pink" (naturally), so I anticipate sewing one for her this coming week.


Thursday, June 5, 2014

Romper PJs Pillowfight!

The pattern has been back from my amazing testers for over a week. All the edits they suggested have been made. The only thing preventing me from getting it listed in the shop was photos.

Yesterday we had a pajama playdate with Erin from Ruffles and Trains and her kiddos. I provided the PJs and she provided the pillows!


There was some relaxed hanging out and chatting, but that didn't last long before the girls were literally climbing the walls.


 Just waiting for permission to have a pillow fight!


Check out the pattern available on Etsy:
Kids Summer Romper PJs

Saturday, May 24, 2014

Summer PJs pattern sneak peek

I've been working on digitizing the pattern for PJs that T fell in love with last year.
I sent it off to a couple testers last week to try it out. Great feedback so far! I'm so excited to share it once I hear back from my other testers and make the tweaks!

For now I'll leave you with a sneak peek!

Monday, May 5, 2014

Kids Choice Challenge


Over on Elegance and Elephants there is a sewing challenge this week! I love these excuses to step out of my comfort zone. This week is Kid's Choice. We are challenged to sew something for our kids - the catch is that they get to choose the fabric.
T picked out this satin with a slight stretch and a bright watercolour floral pattern. This was a remnant she picked out a year ago that I've never done anything with. I let her raid my fabric stash and she pull this out with an excited "THIS! DEFINITELY THIS!"


I've been working on a pattern based on a peasant top but with a ruffle cap sleeve. It was the perfect pattern for this fabric. Especially since it doesn't need a lot of fabric, and I only had half a yard!


T says this top makes her feel like a teenager. Which to her is the best feeling in the world. I don't know why they want to grow up faster than they already are... I'm just glad she still enjoys things like picking flowers.


Wednesday, July 24, 2013

A simple dress pattern

I've been working hard drafting patterns for my girls and digitizing them so I could share them.
Today I managed to get one up and ready in my Etsy shop.
There are several more in the works.
T absolutely loves this dress.
It came together extremely fast, aside from the breaks I took to help them squeeze their ice pops up.
And to be completely honest and let you in on a little secret. I forgot to pay attention to the alignment of the stripes when cutting. The fact that they actually do line up is a happy accident. 


Wednesday, July 3, 2013

Juicy Ice Pops

Browsing Pinterest a week ago I came across this blog post. For a while now I've been making smoothies and freezing leftovers into popsicles for my girls. They tend to prefer the ice pops that come in a little plastic bag though. (I grew up calling them Freezees, but often when I say Freezee people don't know what I'm talking about.) I don't like feeding them what is essentially sugar-water though. Being able to make our own immediately appealed to me.

I ordered 3 packs of Zipzicles, and entered her giveaway. Before all this I'd been in negotiation with someone over craigslist to get a juicer. Friday this past week it all came together and I got a juicer and my zipzicles!

Sunday and Monday were spent juicing and inventing new flavor combinations.
So far some favorites have been:

Cherry-Pear
Juice 10 (pitted) cherries and one pear, divide juice between zipzicles. Freeze for 4 hours or more. (This made 3)

Orange-Carrot-Strawberry
Juice 3 oranges, 3 large strawberries and 3 carrots, divide between zipzicles. Freeze for 4 hours or more. (This made 3 plus some juice to drink)

Blueberry-Watermelon with "dots"
Juice a handful of blueberries and watermelon to taste (We juiced about 1/6th of our watermelon). Put some whole blueberries in each zipzicle before covering with juice. Freeze for 4 hours or more.(This made 6 because we juiced so much watermelon.)

Tuesday, July 2, 2013

Button Earrings

I joined in the Craftaholics Anonymous Gift Swap at the very absolute last minute.

Truth be told it was beyond the last minute, but Linda generously let a few of us in after the deadline. The swap was hosted through Elfster. Its a great site for hosting swaps. I've organized a few on there myself.
I sleuthed out my giftee's pinterest account and found a few pins that inspired what I made for her.
Her style boards are full of some fabulous casual wear and accessories. I decided to go with the theme of "Accessorize." I also tried to color coordinate while still fitting the colors in with the colors she pins most often and making them easy to add to other outfits.
I hope I've nailed her personal style.
I went with two necklaces, 4 pairs of earrings, 2 pairs of hair clips and a chevron infinity scarf.
I bought some earrings like these and I love them. Now that I've made them myself I'll be wearing them all the time, and making them to match my clothes.
I want to show you just how easy the earrings were to make.
On a trip to Joann's Fabrics I picked up a bag of buttons and some earring studs.
Initially I figured I would simply hot glue the buttons to the studs. That didn't hold at all. So on a second trip I picked up some Superglue. (Yes, you can buy this at places other than the craft store, but any excuse is a good excuse. )
I read the instructions on the superglue carefully. This was my first experience with superglue. It lives up to the hype. There was a brief moment where one of my fingers was glued to a button, and another moment where two of my fingers were glued together. The instructions suggest acetone if you accidentally glue yourself to something, fortunately the glue hadn't set and I was able to peel myself off without any damage. But make sure you have some acetone handy Just In Case.

Lay a paper down on your table so you don't accidentally glue anything to the table. You don't need a big paper, I just used an index card.
Turn one of your buttons upside down on your paper. Apply a teeny tiny bit of superglue to the flat part of the earring post. Turn it upside down and press it onto the button. I recommend only holding the post of the earring and not touching the button. Press the post down with your finger for a minute to set the glue.
Let it set for a while before you put the back on or put it on a card. You want the glue to be completely set.
I let mine sit for an hour, but I doubt it needs that long. I just got distracted.
I'm planning on making some for my girls with clip on earring bases.
 If you make some from this tutorial I'd love to see them!