Tuesday, October 14, 2014

Kids Clothes Week Fall 2014!

kid's clothes week

Kids clothes week starts in less than a week!

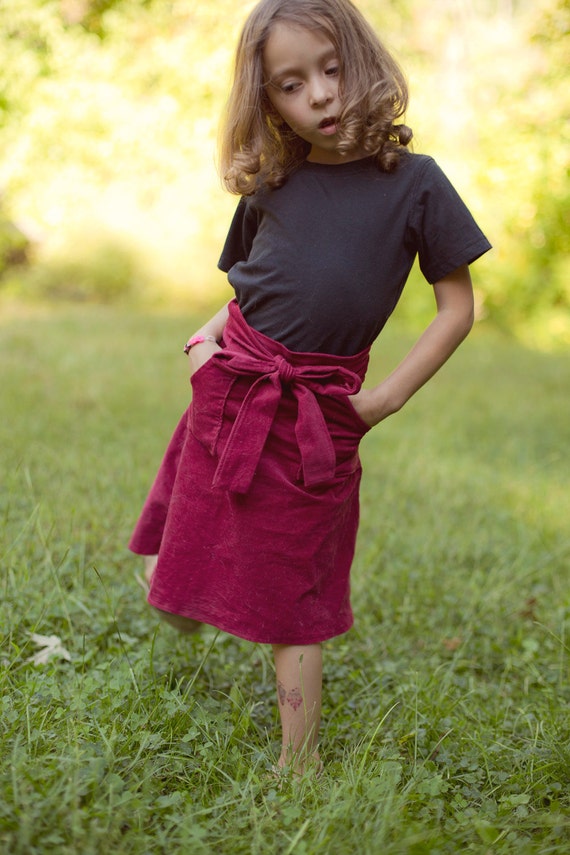
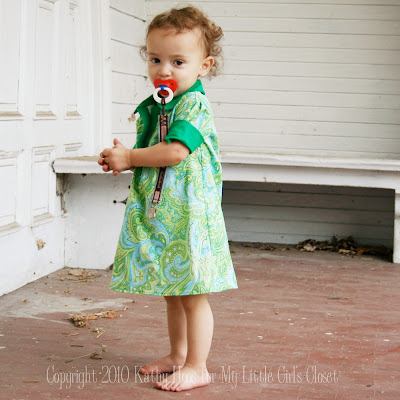
I love sewing for Kids Clothes week because it gives me the much needed motivation to make the things I've promised the girls. I've been sorting my Vintage Pattern collection recently, trying to leverage wordpress to create a visual database of them (which is taking a lot longer than I had hoped). Once of the patterns that I seem to have in many variations is a wrap skirt with pockets. Dahlia picked it out as one she wanted and I redrafted the pattern to her size and sewed it for her. I also graded it and turned it into a print-at-home pdf. Available here

She loves it. Trillian has requested one as well in "hot pink" (naturally), so I anticipate sewing one for her this coming week.


Thursday, June 5, 2014

Romper PJs Pillowfight!

The pattern has been back from my amazing testers for over a week. All the edits they suggested have been made. The only thing preventing me from getting it listed in the shop was photos.

Yesterday we had a pajama playdate with Erin from Ruffles and Trains and her kiddos. I provided the PJs and she provided the pillows!


There was some relaxed hanging out and chatting, but that didn't last long before the girls were literally climbing the walls.


 Just waiting for permission to have a pillow fight!


Check out the pattern available on Etsy:
Kids Summer Romper PJs

Saturday, May 24, 2014

Summer PJs pattern sneak peek

I've been working on digitizing the pattern for PJs that T fell in love with last year.
I sent it off to a couple testers last week to try it out. Great feedback so far! I'm so excited to share it once I hear back from my other testers and make the tweaks!

For now I'll leave you with a sneak peek!

Monday, May 5, 2014

Kids Choice Challenge


Over on Elegance and Elephants there is a sewing challenge this week! I love these excuses to step out of my comfort zone. This week is Kid's Choice. We are challenged to sew something for our kids - the catch is that they get to choose the fabric.
T picked out this satin with a slight stretch and a bright watercolour floral pattern. This was a remnant she picked out a year ago that I've never done anything with. I let her raid my fabric stash and she pull this out with an excited "THIS! DEFINITELY THIS!"


I've been working on a pattern based on a peasant top but with a ruffle cap sleeve. It was the perfect pattern for this fabric. Especially since it doesn't need a lot of fabric, and I only had half a yard!


T says this top makes her feel like a teenager. Which to her is the best feeling in the world. I don't know why they want to grow up faster than they already are... I'm just glad she still enjoys things like picking flowers.


Wednesday, July 24, 2013

A simple dress pattern

I've been working hard drafting patterns for my girls and digitizing them so I could share them.
Today I managed to get one up and ready in my Etsy shop.
There are several more in the works.
T absolutely loves this dress.
It came together extremely fast, aside from the breaks I took to help them squeeze their ice pops up.
And to be completely honest and let you in on a little secret. I forgot to pay attention to the alignment of the stripes when cutting. The fact that they actually do line up is a happy accident. 


Wednesday, July 3, 2013

Juicy Ice Pops

Browsing Pinterest a week ago I came across this blog post. For a while now I've been making smoothies and freezing leftovers into popsicles for my girls. They tend to prefer the ice pops that come in a little plastic bag though. (I grew up calling them Freezees, but often when I say Freezee people don't know what I'm talking about.) I don't like feeding them what is essentially sugar-water though. Being able to make our own immediately appealed to me.

I ordered 3 packs of Zipzicles, and entered her giveaway. Before all this I'd been in negotiation with someone over craigslist to get a juicer. Friday this past week it all came together and I got a juicer and my zipzicles!

Sunday and Monday were spent juicing and inventing new flavor combinations.
So far some favorites have been:

Cherry-Pear
Juice 10 (pitted) cherries and one pear, divide juice between zipzicles. Freeze for 4 hours or more. (This made 3)

Orange-Carrot-Strawberry
Juice 3 oranges, 3 large strawberries and 3 carrots, divide between zipzicles. Freeze for 4 hours or more. (This made 3 plus some juice to drink)

Blueberry-Watermelon with "dots"
Juice a handful of blueberries and watermelon to taste (We juiced about 1/6th of our watermelon). Put some whole blueberries in each zipzicle before covering with juice. Freeze for 4 hours or more.(This made 6 because we juiced so much watermelon.)

Tuesday, July 2, 2013

Button Earrings

I joined in the Craftaholics Anonymous Gift Swap at the very absolute last minute.

Truth be told it was beyond the last minute, but Linda generously let a few of us in after the deadline. The swap was hosted through Elfster. Its a great site for hosting swaps. I've organized a few on there myself.
I sleuthed out my giftee's pinterest account and found a few pins that inspired what I made for her.
Her style boards are full of some fabulous casual wear and accessories. I decided to go with the theme of "Accessorize." I also tried to color coordinate while still fitting the colors in with the colors she pins most often and making them easy to add to other outfits.
I hope I've nailed her personal style.
I went with two necklaces, 4 pairs of earrings, 2 pairs of hair clips and a chevron infinity scarf.
I bought some earrings like these and I love them. Now that I've made them myself I'll be wearing them all the time, and making them to match my clothes.
I want to show you just how easy the earrings were to make.
On a trip to Joann's Fabrics I picked up a bag of buttons and some earring studs.
Initially I figured I would simply hot glue the buttons to the studs. That didn't hold at all. So on a second trip I picked up some Superglue. (Yes, you can buy this at places other than the craft store, but any excuse is a good excuse. )
I read the instructions on the superglue carefully. This was my first experience with superglue. It lives up to the hype. There was a brief moment where one of my fingers was glued to a button, and another moment where two of my fingers were glued together. The instructions suggest acetone if you accidentally glue yourself to something, fortunately the glue hadn't set and I was able to peel myself off without any damage. But make sure you have some acetone handy Just In Case.

Lay a paper down on your table so you don't accidentally glue anything to the table. You don't need a big paper, I just used an index card.
Turn one of your buttons upside down on your paper. Apply a teeny tiny bit of superglue to the flat part of the earring post. Turn it upside down and press it onto the button. I recommend only holding the post of the earring and not touching the button. Press the post down with your finger for a minute to set the glue.
Let it set for a while before you put the back on or put it on a card. You want the glue to be completely set.
I let mine sit for an hour, but I doubt it needs that long. I just got distracted.
I'm planning on making some for my girls with clip on earring bases.
 If you make some from this tutorial I'd love to see them!


Monday, July 1, 2013

Going to the Fair

We took the girls to the carnival this weekend.

T has been begging to "go out" with her little friend P. We organized it so our families were at the fair together and they went on their first "date" (their words, not ours). They were adorable.
At one point during the evening he leaned over, put his hand on T's arm and asked her if she'd like him to win a prize for her. The sweetness of that gesture just melted my heart completely. Then T did something I'm proud of despite it spoiling the moment. She said "That's ok. I can win my own."
It looks like I have a budding rollercoaster buddy in little D. I had to take two seasons in a row off from riding because I was pregnant two summers in a row. Since then the logistics of going to an amusement park with two littles has evaded me. I'm hoping to get out to a park on my own at some point, but that hasn't happened yet. We went on Wednesday night as well. She said she didn't want to go on the swing (made for her age group) but insisted I take her on the Ferris Wheel. As we rode up she said "This ride is AMAZING". Saturday the line was too long, so instead she opted for the swing.
On our way back to rejoin the group she saw the strongman bell and needed to try it. It was supposed to be 3 tries for $2. She couldn't get a decent swing going and it was too cute (and there was no line) so she got to try a lot.
And sometimes you get a capture that makes you think "What's going on here". T was trying to close the teacup door and she literally got all up in D's face.

Thursday, June 27, 2013

Photographing a 4 year old.

My Daughter is a ham. I sew her stuff and tell her we're going to do a photo shoot. These are some of the best shots from the series.
I'm not really sure what this zen like pose is from...
This is pretty standard when I tell her to say cheese.
I'm working on digitizing the pattern for the blazer. This morning I made it out of an interlock knit and it's super comfortable feeling. I want to make one for myself. The tunic was one I sewed from some fabric I received in a Girl Charlee bargain box. As it turns out 9 inches is all you need to make a tunic like that in a size 4.

Friday, June 21, 2013

Belle's Dress

T is going to a birthday party tomorrow. Her little friend E is turning 4.
Now that the girls are in preschool I don't really know their friends as well as I used to. I emailed E's mom to find out what she is into. "She loves dora, playdoh, princess belle, paints, dress-up and clothes - especially frilly ones." I think I nailed it. We'll find out soon.
My favorite local fabric warehouse had this beautiful buttery satin and I managed to snag 2 1/2 yards for $5. The deals you can get when you're willing to work around imperfections can be fantastic!
I took a basic peasant dress top. (I used the pattern pieces from this pattern.)
From there I made a simple A-line underskirt in white. The top skirt was just a rectangle, cut the width of the satin by about 10 inches longer than the underskirt. After attaching the two skirts to the bodice I put the dress on the dress form and started pinning. I followed Melly Sew's tutorial for the skirt. It was really easy. It was a bit tedious trying to do it with the girls around, but once they went to bed I was able to get into a rhythm and found myself shocked when I realized I was down to only two pins left.
I am really excited to give this to her little friend. Are you good at giving birthday gifts? What is your favorite gift you've ever given?

Tuesday, June 18, 2013

I won!

I entered a sewing contest over at one of my favorite fabric suppliers, Girl Charlee.
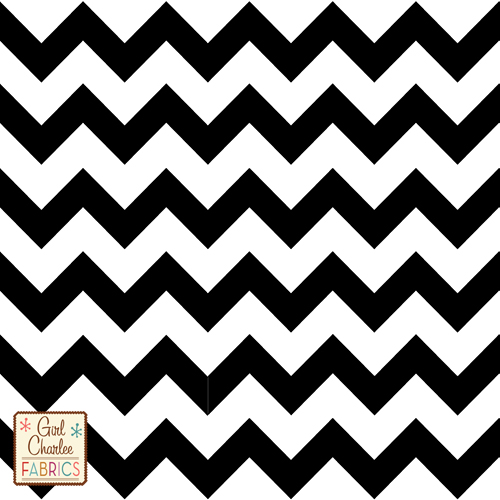
And I won! They asked people to sew something with their black and white chevron jersey.

I had sewn up a tank and panties set for the Tallest. She loves them. She's had me make about a dozen pairs of panties for her. It's a great destash project. I've digitized the pattern, I just need some other people to test it before I put it Out There. Any volunteers? (Details: they are designed for a knit fabric, and I graded them to fit kids size 2-5)

Monday, April 29, 2013

What's new?

Dahlia
It's been a while since I've blogged here, so I thought I'd do a quick What's New post.

The single biggest change with naturally with the girls. They are 3 and 4 now and both in preschool. While I would love to be one of those home-schooling supermoms, they love going to school and I love it too. Now I can go grocery shopping without having to push one of those carts with the cars attached. I can wash my hair in peace. I can even crawl back into bed for a nap.

They also have strong opinions on what they will and will not wear. It was a rare day when they would choose to wear something I'd made. Until I started working with knits. Once I started with knits they started demanding new clothes all the time.

Trillian

 I've been doing a lot of pattern design lately. I'm excited to show some of it off.

So what's new with you?

Thursday, April 25, 2013

Stay Tuned!

I've taken a few years off of blogging here but with more time for my sewing adventures I'm coming back!
Stay tuned!

Thursday, August 5, 2010

Why I'm a bad blogger

I thought I'd share with you what I normally look like when I blog. This might give you insight into why I don't blog nearly as much as I'd like.


I sneak everything into nap time. This little sweetheart, however, often needs to be held during her naps. She struggles to fall asleep - unless we're in the car.


(she's in my lap on a pillow in this picture)

So what have I been up to otherwise?
Well we're Home right now. Home for me is Ottawa. As much as we've made a home in New Jersey, if you ask me where I call home it's Ottawa. I hope one day the rest of my family will be able to say the same thing. Unfortunately there are certain obligations that keep us in New Jersey.


We took the girls to Park Safari. It's about a 3 hour drive from Ottawa. They have a safari where you drive around a route and look at all kinds of animals. Huge signs say "don't feed the zebras, they bite" but they were the only ones interested in the food we bought at the entrance.
We didn't feed the zebras but other people weren't as paranoid as I was.


Zebras don't eat babies do they?

We all had so much fun and T is still talking about the "seebas"

Monday, July 26, 2010

Making a Watermark


A friend of mine lamented over twitter this morning that she wants to be able to add a watermark to photos in photoshop. (Actually she wants to learn more about photoshop, so I foresee more of these posts coming as well)
I know how to do this so I thought I'd share.

But first, a disclaimer for Etsians.
A lot of the times when I'm making a treasury I want to feature something but it has a big fat watermark that ruins the photo. Be tasteful in your watermarks. I personally always crop my images for etsy to be 1000 pixels square. Etsy will crop your image to fit 170 x 135 for the front page, as well as for treasury features. (For the finds it's 200 pixels square)
This means that in order for your watermark to not be shown in the treasury it needs to be in the part of the image that gets cropped out.
If you want to just take treasuries and front page into account and not worry about the finds here is the math:
Figure out how tall your watermark is. Mine's 100px. Multiply that number by 2 (thus 200px) Because Etsy crops evenly on the top and bottom, that is how much you need to extend your image.
A 170 x 135 image becomes 1000 x 794 when enlarged to be 1000px wide. Thus to hide my 100px high watermark I need to make my image 1000 x 994. (But I'm just going to make it square because I like it that way)
Here's what the picture above looks like in a treasury.



Onto watermarking!
The easiest way I have found to watermark is to make a layer that you copy onto every image. Unfortunately you can't save layers in jpeg, gif or png, the three formats Etsy accepts. So make sure you save an unwatermarked version of the image before you save it with the watermark. In case you ever want to go back and change your watermark, crop the image etc etc.
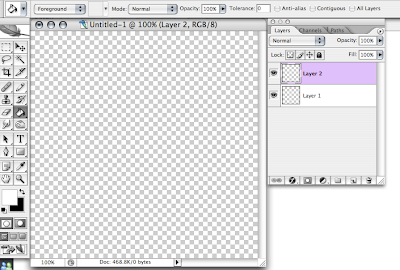
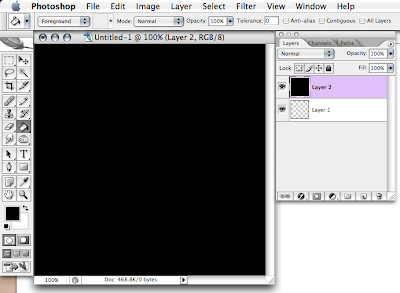
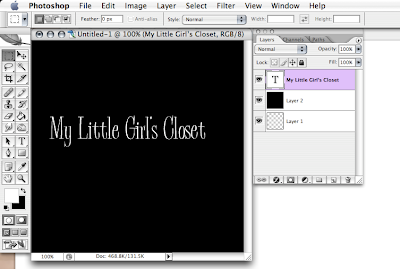
So first we create the image we want for our water mark. To do this we want an invisible layer and a layer with our watermark design on it. (I like using white for my watermarks but you can experiment with other colors, it will be translucent when we are done) Because I like mine white, I like to have a temporary black layer so I can see what I'm working on.

Open a new file. (I made mine square so I can play with how it'll fit on my images)
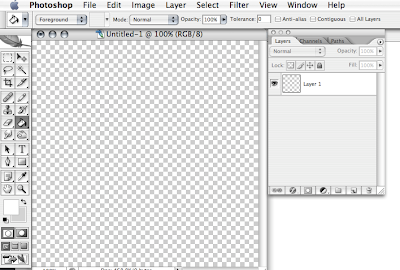

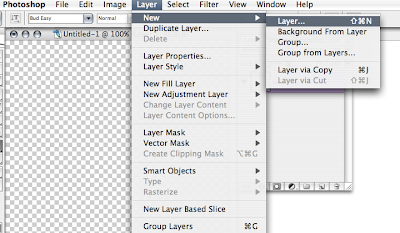
Make a new layer


Fill that layer in with black

The text tool will automatically make a new layer for your text.

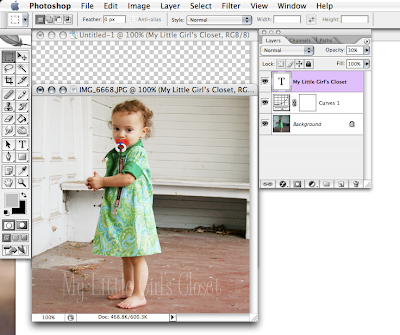
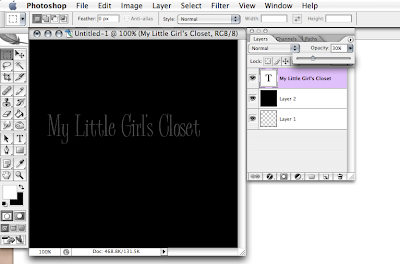
Change the opacity of the layer (This might need to be adjusted after you apply it depending on the brightness of the image)

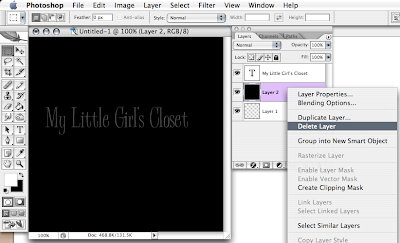
Delete the black layer

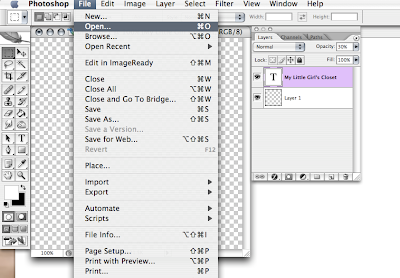
Open the image you want to watermark

Make any adjustments (see my curves layer?)
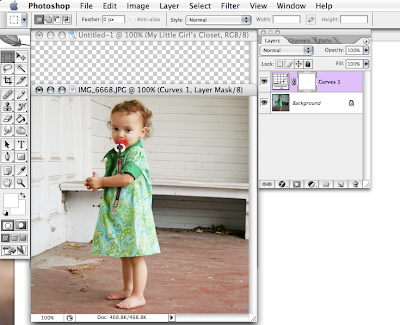

Drag the watermark layer onto the photo and drop it. Make sure the watermark layer is the very top layer. Move it to where you want it on the image and voila!