Friday, March 26, 2010

Tutorial: Making and Using Bias Tape


Bias Tape intimidated me for a long time. And for a long time I was applying it wrong. So I've put together this little tutorial to help others use bias tape better.
I'm going to show you how to make bias tape, how to finish the ends for something like a strap (like in the Oliver and S Popover Sundress), how to attach to fabric for a trim and how to connect it to form one continuous piece around a circle.

First, what is bias tape?
Bias tape is a strip of fabric cut on the bias. It can be single fold, double fold, thick, thin. You can buy it premade or make your own. I use the premade when I want a solid color and make my own when I want a more interesting visible trim. Some people use bias tape to finish seams. It's also useful for straps, hems, and binding. The reason it is cut on the bias is to give it more stretch and flexibility. Sometimes if I'm making a strap for a dress or something where the flexibility is not important I won't cut on the bias. But anytime you're going to use it to trim, particularly around curves and corners, cutting on the bias will make it so much easier to use.

Making Bias Tape
So many times I've been laying out patterns on fabric to find that the only reason they want as much fabric as they do is because there's a long strip of bias tape. With a little extra effort I've found a way to use significantly less fabric - as long as you don't mind a few seams in the bias tape. Here's how:

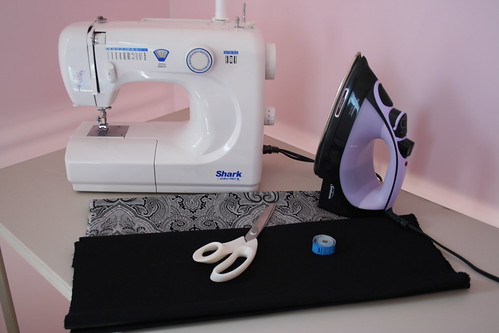
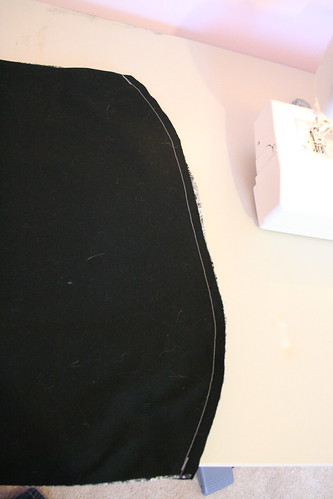
Assemble your materials. You'll need: a rectangle of fabric - I'm using half a fat quarter, coordinating thread, scissors, and a ruler.


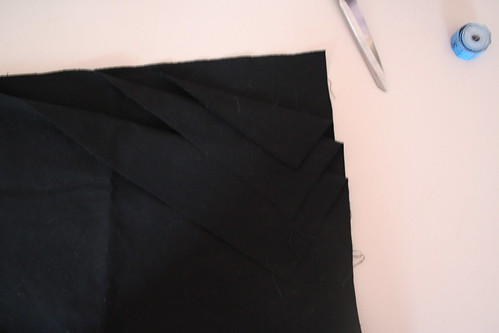
Lay the fabric out and fold one corner to the opposite edge to create a right angled triangle.


Cut the triangle out and place on the opposite edge


Place right sides together and sew to create a solid trapezoid of fabric.


(alternatively you can simply cut a trapezoid out of a larger piece of fabric, but this method leaves no scraps.)


Decide how thick you want your finished tape to be and multiply by 4 to figure out how wide the strips you will need will be. I want half an inch so I need to make 2 inch strips.


Cut a series of strips that width.


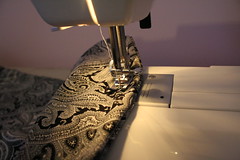
To sew the strips together place right sides together like in the image.


Sew across where the two fabrics cross.


Unfold, press and trim the excess fabric and thread. Repeat with all the strips to create one long piece.


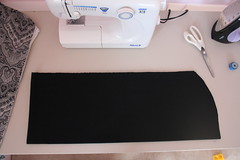
Fold in half and press (iron) to mark center line. Unfold and fold the edges to the center line and press. Re-Fold along the center line again and press. This will create a strip of fabric that is 4 layers thick.
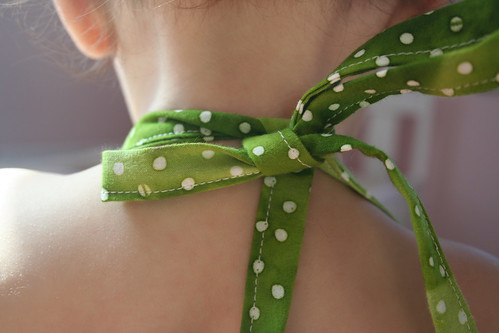
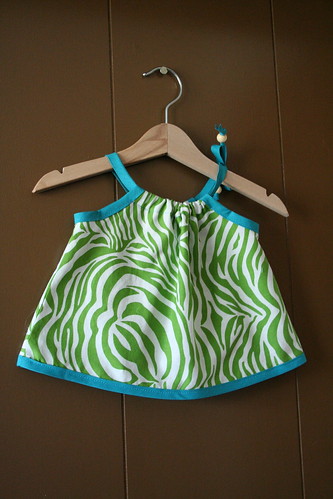


Making a strap
To make a strap some sources will tell you just to fold in half an inch and sew. This is method is a bit more complicated but it leaves a beautiful finished end.

First fold back along the center fold so that the center is folded the opposite way it naturally creases


Sew across the edge, and clip.


Turn right side out, allowing the center to fold as it should. To get a nice corner use a blunt object that will not damage the fabric to poke out the corner.


Sew close to the edge.


Voila, a strap.


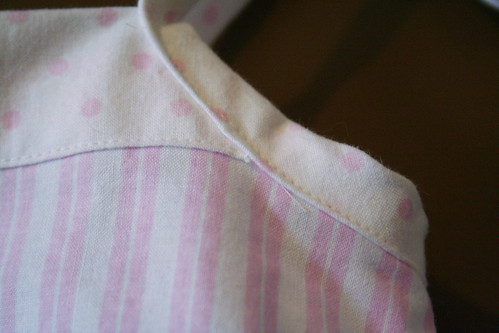
Attaching bias tape as trim

Lay out the section you want to attach the bias tape to. In this example it will trim armholes of a shirt to create a nice finish on a sleeveless top.


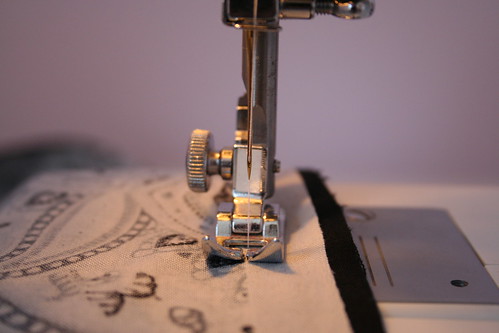
Unfold and pic the raw edge of the bias tape to the raw edge of the fabric. it doesn't matter which side of the fabric you pin to because this seam will be hidden.


Using a small seam allowance, sew the bias tape to the fabric, being careful not to extend past the fold line.


Fold the bias tape over the raw edges


Sew close to the fabric along the bias tape to finish


Connecting to form a continuous loop
Some places you'll need to connect the bias tape. For instance when used as trim on a hem. Here's how to line up the connection with another seam.

Pin the bias tape all the way around leaving a little room near where the join will occur.


Bring the bias tape together and create a fold where the seam you want to blend in with is.


Press with fingers or iron to create a guide line.


Sew along the guide line, trim edges.


Open, finger press and pin seam before continuing, by sewing to the raw edge, folding over and sewing close to the fabric along the entire continuous piece.


The two seams should line up.

IMG_4002
Enjoy!

Button Woes

I hate sewing on buttons. The dress is done, I just need to get out the needles to hand stitch the hem and the buttons.
I love the dress though! So I'm going to try an experiment. I bought a men's shirt, I'm going to see if I can make the dress from that. Also since I just got the shirt at a thrift store for $2.50 it was actually cheaper than buying fabric...
I've been trying to get some stuff ready for my etsy shop's grand opening. I'm going to have a sale of some sort to celebrate, but I need to get everything organized and a few more things sewn before I can open shop.
T, the toddler, is sick so everyone in the house is miserable from lack of sleep. Last night I ended up making a 2am run to get infant tylenol. When I got home I just sat still in peace and quiet for 10 minutes. I almost pulled an all nighter sewing but decided sleep was the smarter option. I love my girls dearly but the thought of having even just 6 hours with no demands on my time makes me giddy. Too bad that's not going to happen in the foreseeable future.
I have several things to show off including a couple great tops and a couple dresses... But it'll have to wait. Coordinating the kids, camera and uploading is more than I can handle today.

Monday, March 22, 2010

In progress: Puppet Show Dress


My pattern arrived! Because I'm constantly chasing my two girls around, I don't get a lot of sewing time per day. Saturday I cut out all the pattern pieces and the fabric I needed. Sunday I assembled most of the tunic. I just need to sew on buttons and button holes now. The pants are ready and waiting for me to sew them.

In other news, we are redoing the girl's room. My husband stripped the entire room right down to the studs. (And in some places discovered that he needed to rebuild the studs too!) The closet finally got it's last coat of paint and the new hardware installed this weekend! I can finally hang things up! My big plans for today include putting away a ton of clean clothes. I've got two different colored hangers so it will be easy to identify who's clothes they are.

I can't wait to get their old room back! I'm going to move all my sewing stuff in there!

Friday, March 19, 2010

Tutorial - Pouch Sling

brown sling

I LOVE to wear my baby. Dahlia snuggles right in and gets comfortable in our pouch sling. She is happiest when she is cuddled right next to me and able to choose between viewing and interacting with the world and napping. I can even nurse in this sling - and hands free too! And Dahlia loves the sling too, sometimes she even drools on it...

brown sling wet

After posting a couple photos of Dahlia passed out in the sling I had several requests for a tutorial. So I've put one together. And I think the timing of it is perfect. Pouch slings are getting a bad name in the media these days. User Error has, tragically, caused the deaths of 14 infants in the past 20 years. Because of this, the Consumer Product Safety Commission issued a warning to be cautious using an infant sling for babies under 4 months of age. Fortunately they posted an image showing the proper way to carry a baby. Your baby needs air. Making sure that they are breathing fresh air and not air they've just exhaled is the key to knowing if they are in the sling appropriately.


The other key is having a sling that fits your body perfectly. My husband and I can not use the same sling because we are different sizes. This means I have the freedom to choose fabrics I would like to wear without having to worry about sharing with him.

Onto the tutorial! All photos are links to the photos on flickr, so if you need to see something closer please click away!

1) Assemble your supplies.
You will need:
2 yards of the pretty fabric of your choice. (I prefer quilting cotton because you can get it in a HUGE selection of prints)
2 yards of a bottomweight like, corduroy, denim or twill. (avoid stretchy fabrics though, they will mess up the ever important fit)
Sewing machine
Thread
Measuring tape (or a string will do in a pinch)
Scissors
Iron (and ironing board)

Gather supplies

2) Measure from your shoulder to above your hip bone, diagonally across your body. You want to measure where the sling will sit against your body. I measure 28".
Take this measurement and add 3" to it. Multiple the result by 2. So for me the end number would be (28" + 3") x 2 = 62"

3) Cut both fabrics into rectangles that are 22" (usually this will be half the width of your pretty fabric) by the number in step 2. (mine is 22" x 62")

4) One fabric at a time. Fold the fabric in half twice so that all the corners meet.

Fold fabric

5) Cut a curve off the corner. You want the curve to come in 3" along the long side. You can stretch it as long as you want across the short side, this determines how steep the sides of the pouch are. I like mine pretty steep so I keep the curve fairly short. Do this for both fabrics. (I like to use the first fabric as a template for the second)

Cut fabric

6) Unfold everything and place the fabrics right sides together. Sew the fabrics together along the long sides. This creates a tube.

Sew into a tube

7) Turn the tube right sides out and iron. (Trust me. Iron it now.)

8) Figure out which fabric you want facing out most often. (the sling can be worn either way, but one way has a little flap that you'd have to hand sew down if you want it to lay flat) Fold the flattened tube in half so the fabric you want on the inside is together. Sew the ends together. (This seam is weight bearing, so please make sure you back stitch at the beginning and end)

Sew ends together

9) Turn the sling the other way, so the inner fabric is outside. enclose the seam by sewing another seam with a slightly larger seam allowance.

Enclose seam with another seam

Enclose seam with another seam

10) Wear with pride!

New Sling

Wednesday, March 17, 2010

Oliver and S Popover Sundress

Oliver and S make some of my favorite patterns. A couple days ago I received a shipping confirmation that said the puppet show tunic and shorts pattern has shipped to me! It doesn't say who bought it for me, but I think I know who it was. I'm super excited to make it!

While I was exploring free patterns online I found the Popover Sundress pattern.
IMG_3508
It was super easy and super fast to make. I was even able to use some remnants I've had laying around for a while. I made my own bias tape which was the most time consuming part of the process.

IMG_3513
The pattern was a size 2T so it will be a while before either of my girls fit into it. The pattern includes up to size 8. I expect this will become a staple of my girls' summer wardrobe for the next 8 years.

Tuesday, March 16, 2010

Playdate Dress

IMG_3594
We have a St Patty's day themed playdate to go to today. Everyone is supposed to wear green. T didn't have anything green to wear so I wanted to make her something fun. I went to Joann's to buy fabric and ended up buying a pattern and a whole stack of remnants. I love that most remnants are big enough for me to use for clothes for the girls. This beautiful batik was almost a full yard so there is plenty left over for me to make a matching kerchief.
I'm so glad spring is finally here!


IMG_3586


IMG_3642

Monday, March 15, 2010

Habitual kimono and JCaroline pants

Kimonos are a super cute piece to add to your children's wardrobe. Because they wrap around they are much easier to get baby into than a wiggle in top. As they get older they can look cute as pajamas or as a top. Sewing a kimono is fairly easy, and altering the pattern to make a dress instead of just a top is really easy as well. There are a quite few baby and children kimono patterns available online.Even Martha Stewart has one. My favorite one is: http://habitual.wordpress.com/kimono/I made a bunch of them when I was pregnant and I love them! The pattern is super easy to follow especially with all the photos to help out!There's even a flickr photo group for photos of ones people have made. http://www.flickr.com/groups/816319@N21/

Saturday, March 13, 2010

My Little Girls

I have two beautiful daughters. They are 16 months and 3 months old. People often call me crazy for having them so close together. I think I'm blessed. With such a small age difference they will be such good friends.

The girls

I joke that it also means I don't have to give up my sewing room yet, but alas, it seems I already have. That doesn't stop me, however, from pulling out my sewing machine and trying to create in the rare times when both girls are asleep.

I've started this blog to share some of my favorite patterns and tutorials from around the web. I'm also hoping that, by some miracle, I will have time to include some that I've created myself.